

A few days ago I mentioned that I would be back soon with an easy sew pants tutorial. Well get this! I am actually back with the tutorial. Pictures included and all. AMAZING! That means that I was able to 1. find my camera, 2. my table was free of food particles so I could actually cut fabric and 3. my monsters (I mean darling children) allowed me the 25 minutes it took to sew these up. But I digress. This is what the end result is:
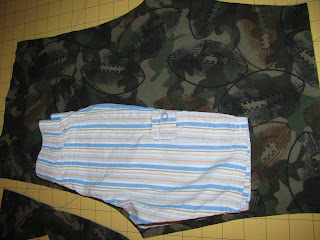
So, your first step is to find a pair of RTW (that's ready to wear if you aren't in the know)pants that fit the person you are making them for. Then you need to fold them up, with the front of the pants hidden, and the back exposed, making a little point in the butt. Don't you like me technical terms? lol This is what your pants need to look like before you start cutting.
Then with the butt pointing to the outer part of the fabric, cut with an approximate 1/2 inch added. After you cut the one side, flip the pants and cut the other side out, with another 1/2 inch added. Note: Please add at least 1 1/2 inches to the top of the "pattern". You'll see why later.
Now take your pattern pieces and turn them right sides facing each other. Pin the top part, that will be your waist, serge or sew up the rise. If you're sewing, use a 3/8" seam.
Now you want to take your pants to the other side of the house where you have your iron because you are just organized like that. You are going to iron leg cuffs by folding the pants "leg" up, then up again. Then stitch a cuff, remembering to backstitch or go back a bit to lock the stitching.
Now you are going to trek back to the East Wing to serge up the pants legs. If you were truly organized you would remember to also press the waist. Alas, I am NOT this organized so we'll come back to it. with right sides still facing, match up the crotch seams and pin the legs. Start at one cuff line, sew/serge all the way to the other cuff edge. Backstitch! Now we go back and iron down the waist (this is why we left extra inches at the top of our pattern), then sew around the waist creating a casing but leave at least one inch unstitched to allow room for feeding the elastic through. After you feed the elastic through the casing, sew the two ends together and now you can finish your
pants by closing up the casing seam.
And Viola! You now have a super cute, easy, and quick pair of pants and you even created the pattern!
I love easy pants! Your baby is getting big. How about a birth story???
ReplyDelete